Bottom Bracket Retool
I recently got a year membership to Bike Kitchen in San Francisco. That basically means I can work three hours a night for one or two nights a week on my bike. I also purchased digging rights, which means I can build a complete bike from their spare bike parts. All costs are already included. The folks there are pretty helpful, some more so than others, but overall, once you start to understand the layout of the tools and what you're allowed to do, and a little bit of etiquette, and also once you have an idea of what the hell you're doing, it's the same as settling down and just getting work on the bike done for hours.
After I chose a nice 52" Bridgestone bike frame from their spare project frames, I decided the first thing I could do was to fix the bottom bracket. (Actually I spent some time last week messing with getting wheels and playing with the handlebars, but nothing real got done.) The frame I chose had the crank and pedals removed already, and only the bottom bracket with the nuts were still on.

1. Remove the bottom bracket. There should either be places for a wrench, or little notches on the sides. One side should have a lock ring. Also see Sheldon Brown's website, although I found it much easier to understand after actually working on one.
http://sheldonbrown.com/images/bb-cupandcone.jpg
2. Clean off the grease, and remove the bearings. There were 11 bearings in each of my cups but i'm not sure if that was the original number, but they fit fine. The grease came out with a lot of simple green and scrubbing, then i dried it off and sprayed some silicone lubricant over it (wd-40 would work too.)
3. One of the volunteer mechanics told me, you can never have too much grease. So I filled the cup with grease. Also grease up the threads in the bracket.
4. Thread the cup back in. One side is fixed and threads all the way in until it is flush. The other side will thread in after the axle is inserted, and can be adjustable so the bearings aren't too tight and the axle doesn't wiggle.
5. Put the axle in, and thread the other cup in. The drive side (right pedal) of the axle should be longer than the other side.
6. The other side is adjustable. The lock ring goes over the left side (non drive side). The cup is adjusted so that the axle still turns smoothly, but doesn't have any wiggle room side to side.
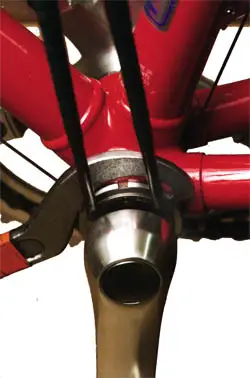
7. Here is the tool used to adjust it.
8. Here is the lock ring that prevents further turning of the cup.
9. The crank took is used to tighten the nuts of the cranks. The cranks will have square holes for this setup, and some have splines instead. To remove the crank, a crank puller is needed because the crank is pushed really tightly onto the axle.
10. The final result. Cleaned bottom bracket, new grease for old bearings, and attached cranks.


No comments:
Post a Comment